The complete line of RAMCO flange guards and safety shields, produced from either fabric or metals, are wraparounds. The difference between the two groups is the method of securing them on the pipe connection or valve. Fabric shields are fastened securely by tie-down cords; metal shields are held firmly in place by metal screws or bands.
All shields are shipped directly from the RAMCO plant-ready for installation. Each package of flange guards or shields includes installation instructions for quick reference. Fabric shields require no tools for installation, and metal shields need only the use of a Phillips screwdriver.
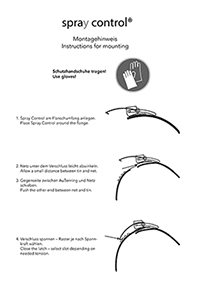
Incorporated within each RAMCO fabric shield is a velcro fastener that holds the shield in place over a flange, pipe connection or valve allowing installation of the shield by a single worker in less than a minute.
Installation steps are as follows:
Installation instructions are as follows:
Click on the image to download it at a larger size to view the diagrams.
Installation instructions are as follows.
These unique safety devices and spray guards installed over flanges, pipe fittings and valves contribute to a safe work environment. In the event of a leak, the indicating patch in each thermoplastic shield (except the “See-Thru” Shields) will turn color signaling an alert. These shields will contain and deflect temporarily the escaping hazardous, toxic chemical, and thereby, mitigate the effects of a potentially devastating sprayout.
 © 2026 Ramco-SafetyShields, LLC. All right reserved.
Our website is available in many languages, courtesy of Google Translate. Select your preferred language below.
The eCommerce portion of our website is available in multiple currencies as well. Select the currency you wish to pay in below.
Currently:
US Dollars (USD)
Pounds Sterling (GBP)
Please note: We currently only offer shipping to the US and UK, and the currency of each order must match its destination country. If you would like to ship to a different country, you will be able to submit your cart for a quote on the checkout page.

